Home Automation on a weekend DIY
(Posted on 7-Jan-2019)
In the era IoT, Let us try do simple thing like switching on /off your lights/fan through mobile.
First let's try to switch on and switch off a LED using mobile phone. We are going to use ESP8266 ESP-01 for this. ESP8266 is a cheap(under Rs.200) SoC(system on chip) wifi module that can be used without the need of a microcontroller.
In normal web development, imagine you are going to make two http GET calls, one for writing "0" and the other for writing "1" in to a variable/file/db. The first call writes "0" and second one overwrites it with "1" and vice versa, essentially the calls toggle the value written.
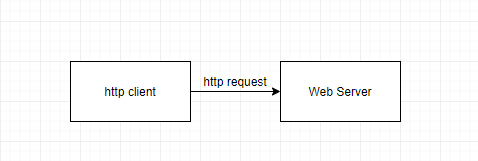
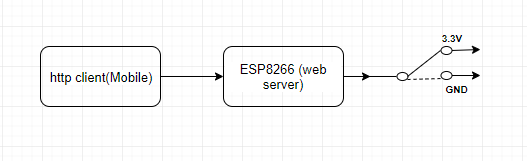
With ESP8266, it can switch the output to positive or ground based on the http calls. If the output is positive we can switch on the LED, and off if it is not. So with the http request you are able to control LED, and this request can be made from a mobile phone.
Steps
Let us make our device as web server. To make ESP8266 as a webserver we got to upload the webserver program into its memory.
How to do it?
Download, install and configure Arduino IDE on your machine/laptop as mentioned below.
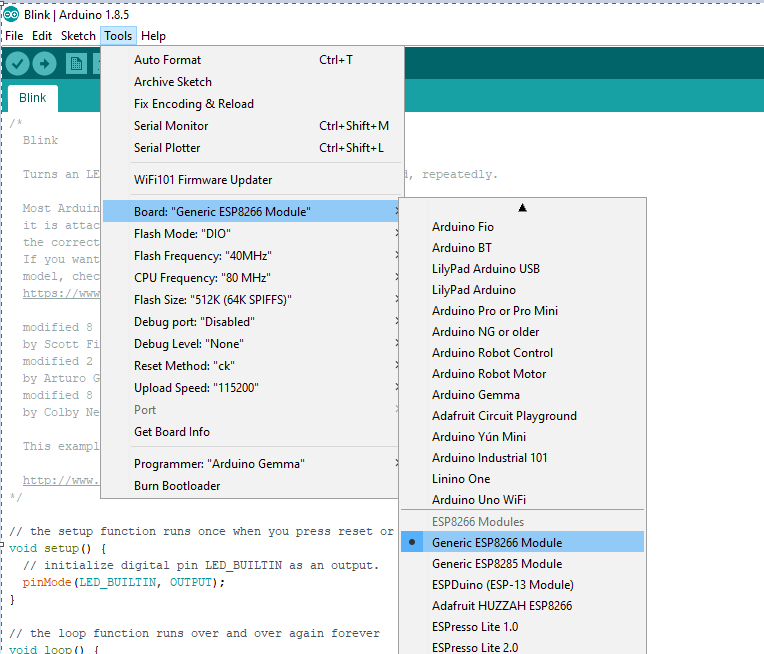
Choosing the ESP8266 board
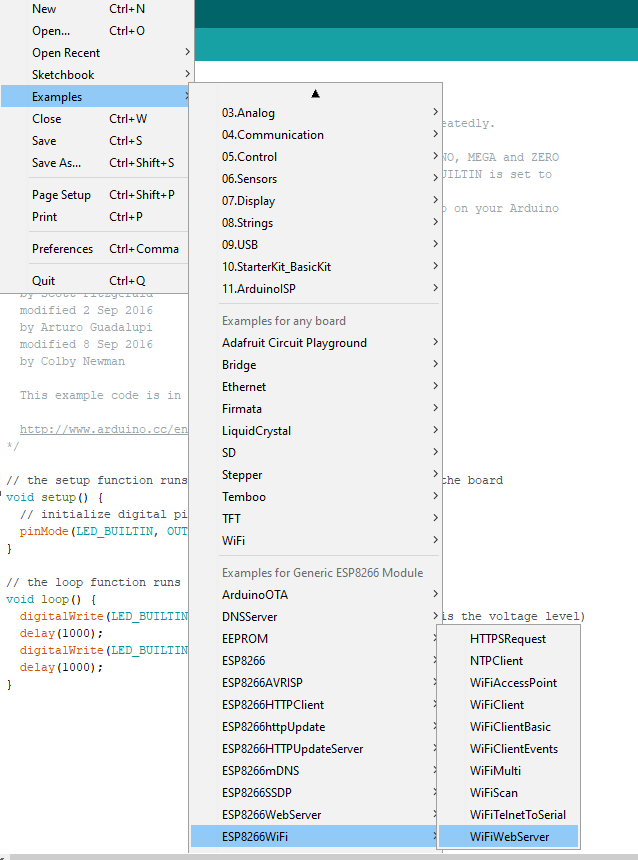
Navigate to the sample wifiWebserver code provided as shown below.
Now we need to push this program to our ESP8266 device, which is called flashing.
We cannot connect ESP8266 to USB directly, so we need a convertor. CH340G(under Rs.100) is a USB to serial convertor, which is used in this project.
ESP8266 is 3.3 volt device, so it would get damaged if you connect to 5v input. CH340G provides both 3.3v and 5v output, set 3.3 volt using the jumper as shown below.
For flash mode set the GPIO0 to GND, connect as shown below.

Connect the transfer pin of the CH340G to the receiver pin of the esp8266 and the receiver pin of CH340G to the transfer pin of ESP8266, Connect the VCC and CH_PD of the esp8366 to the 3.3v pin of CH340G, connect CH340G to the USB port of your laptop/computer. Our device is now ready for the IDE to flash it with webserver program. Open the arduino IDE and upload the wifiWebServer code to the esp8266 after modifying the SSID and the password for the wifi network.
What do the wifiWebServer "C" code does?
Sets up the web server on port 80, connects to the wifi network with the specified SSID and password, waits for the incoming http request. If the request has the path "/gpio/0" then sets the GPIO2 pin to low, If the request has the path "/gpio/1" then sets the GPIO2 pin to high.
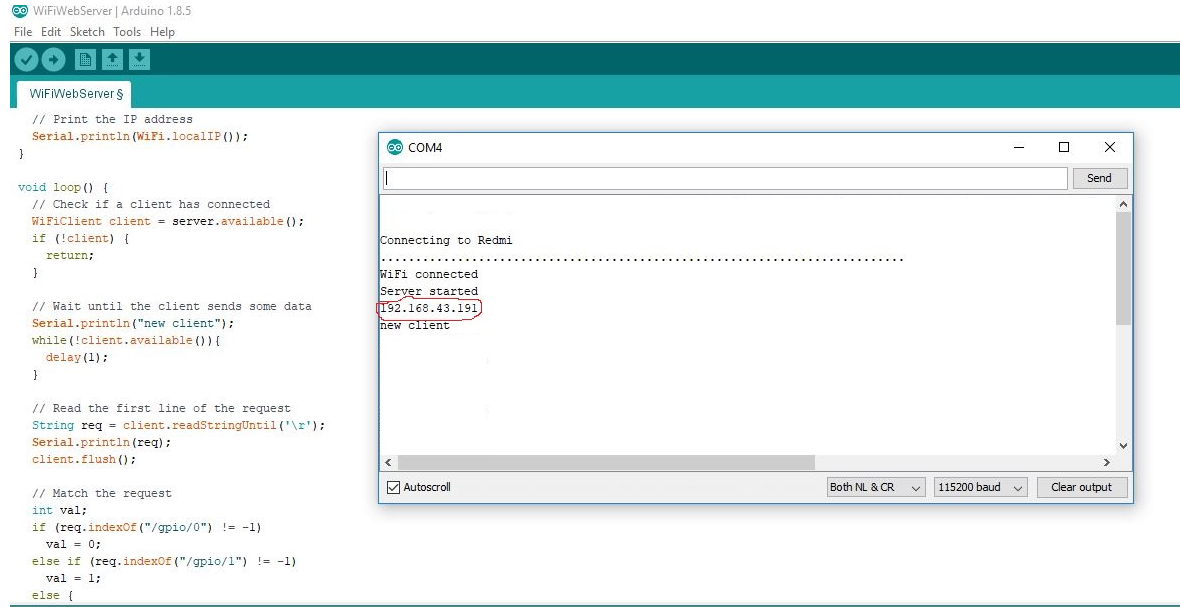
After successfully uploading the code, disconnect GPIO0 and reset(by grounding the reset pin) it to boot with the uploaded program, open the Arduino monitor to look at the log, Get the IP address of the web server logged.
You can connect to the web server through the IP address from a mobile connected to the same wifi network.
http://<ipaddress>/gpio/0 makes GPIO2 low
http://<ipaddress>/gpio/1 makes GPIO2 high
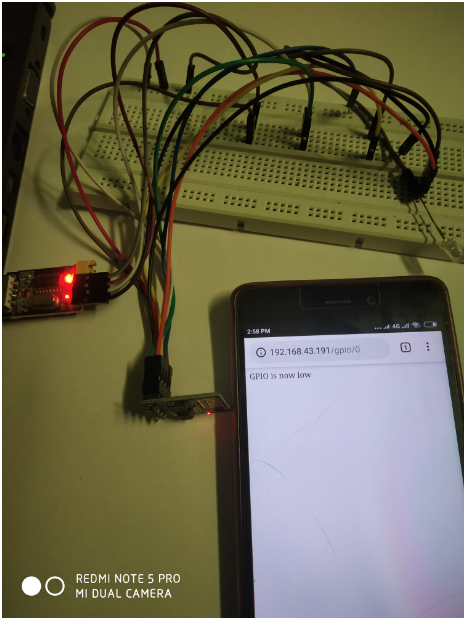
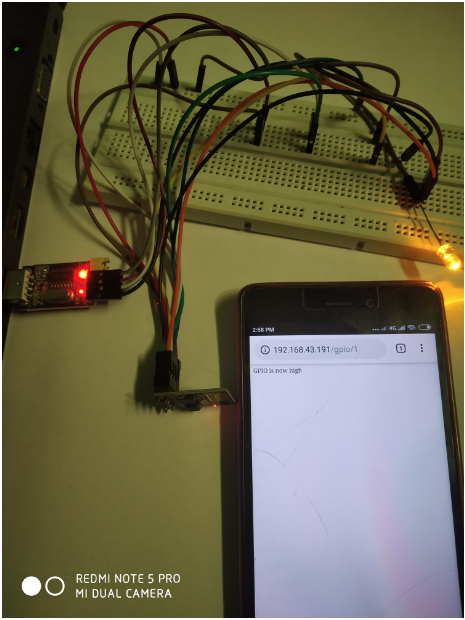 Using the http calls through the mobile browser, GPIO2 can be made high or low. Connect a LED to the GPIO2 and GND, it can be switched on or off now using the mobile phone.
For normal working mode disconnect the GPIO0 from GND, disconnect the TX and RX connections, CH340G just acts as power source for the 3.3v.
Using the http calls through the mobile browser, GPIO2 can be made high or low. Connect a LED to the GPIO2 and GND, it can be switched on or off now using the mobile phone.
For normal working mode disconnect the GPIO0 from GND, disconnect the TX and RX connections, CH340G just acts as power source for the 3.3v.
We have controlled LED through mobile, let us see how to control light/fan or any electrical devices the same way.
From electronics to electrical
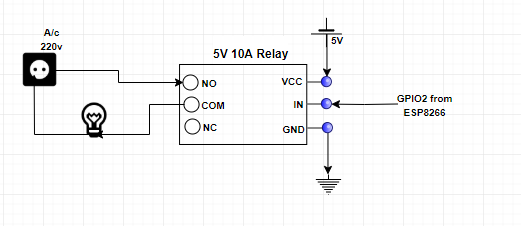
For working with electrical devices involving higher voltage and current use a relay to operate it. The output from gpio2 acts as input to the relay, based on the gpio2 input, the relay can switch on/off electrical devices connected to it. Make the connections as shown in the figure, NO(Normaly Open) will be active when the GPIO2 is high.
Hope you had fun doing this....
About the Author: Manoharan D, Having two decades of IT industry experience, working for a private IT company in Chennai, India.
First let's try to switch on and switch off a LED using mobile phone. We are going to use ESP8266 ESP-01 for this. ESP8266 is a cheap(under Rs.200) SoC(system on chip) wifi module that can be used without the need of a microcontroller.
In normal web development, imagine you are going to make two http GET calls, one for writing "0" and the other for writing "1" in to a variable/file/db. The first call writes "0" and second one overwrites it with "1" and vice versa, essentially the calls toggle the value written.
With ESP8266, it can switch the output to positive or ground based on the http calls. If the output is positive we can switch on the LED, and off if it is not. So with the http request you are able to control LED, and this request can be made from a mobile phone.
Steps
- Make ESP8266 as a wifi web server
- Connect the wifi web server to your(wifi) network
- Make http request from your mobile connected to the network to control the web server output
Let us make our device as web server. To make ESP8266 as a webserver we got to upload the webserver program into its memory.
How to do it?
Download, install and configure Arduino IDE on your machine/laptop as mentioned below.
Choosing the ESP8266 board
Navigate to the sample wifiWebserver code provided as shown below.
Now we need to push this program to our ESP8266 device, which is called flashing.
We cannot connect ESP8266 to USB directly, so we need a convertor. CH340G(under Rs.100) is a USB to serial convertor, which is used in this project.
ESP8266 is 3.3 volt device, so it would get damaged if you connect to 5v input. CH340G provides both 3.3v and 5v output, set 3.3 volt using the jumper as shown below.
For flash mode set the GPIO0 to GND, connect as shown below.
Connect the transfer pin of the CH340G to the receiver pin of the esp8266 and the receiver pin of CH340G to the transfer pin of ESP8266, Connect the VCC and CH_PD of the esp8366 to the 3.3v pin of CH340G, connect CH340G to the USB port of your laptop/computer. Our device is now ready for the IDE to flash it with webserver program. Open the arduino IDE and upload the wifiWebServer code to the esp8266 after modifying the SSID and the password for the wifi network.
What do the wifiWebServer "C" code does?
Sets up the web server on port 80, connects to the wifi network with the specified SSID and password, waits for the incoming http request. If the request has the path "/gpio/0" then sets the GPIO2 pin to low, If the request has the path "/gpio/1" then sets the GPIO2 pin to high.
After successfully uploading the code, disconnect GPIO0 and reset(by grounding the reset pin) it to boot with the uploaded program, open the Arduino monitor to look at the log, Get the IP address of the web server logged.
You can connect to the web server through the IP address from a mobile connected to the same wifi network.
http://<ipaddress>/gpio/0 makes GPIO2 low
http://<ipaddress>/gpio/1 makes GPIO2 high
Using the http calls through the mobile browser, GPIO2 can be made high or low. Connect a LED to the GPIO2 and GND, it can be switched on or off now using the mobile phone.
For normal working mode disconnect the GPIO0 from GND, disconnect the TX and RX connections, CH340G just acts as power source for the 3.3v.We have controlled LED through mobile, let us see how to control light/fan or any electrical devices the same way.
From electronics to electrical
For working with electrical devices involving higher voltage and current use a relay to operate it. The output from gpio2 acts as input to the relay, based on the gpio2 input, the relay can switch on/off electrical devices connected to it. Make the connections as shown in the figure, NO(Normaly Open) will be active when the GPIO2 is high.
Hope you had fun doing this....
Post your comments
About the Author: Manoharan D, Having two decades of IT industry experience, working for a private IT company in Chennai, India.
Archives
Nov-2018 Real-Time Sentiment analysis
Oct-2018 Coding Automation
Nov-2016 From HTML to Machine learning
Nov-2018 Real-Time Sentiment analysis
Oct-2018 Coding Automation
Nov-2016 From HTML to Machine learning